HyperFrames vs Remotion: Pricing, Performance and Setup (2026)
Compare HyperFrames and Remotion using real editor screenshots, current licence costs, honest performance evidence, and setup steps for both tools.
You can now build a product intro or animated explainer with familiar web technology. Two projects you will often see are HyperFrames and Remotion. Both can turn code into video, and both can be used with coding agents. The best starting point depends on your team’s code, licence eligibility, rendering setup and how much you need to change each video.
Quick answer: HyperFrames’ local framework is open source under Apache 2.0. Remotion is free for eligible individuals and organisations of up to three people, but larger commercial teams generally need a paid licence. Neither is universally faster: rendering time depends on the composition, machine and output settings. This comparison follows the official documentation checked on 27 October 2026.
What the two editors actually look like
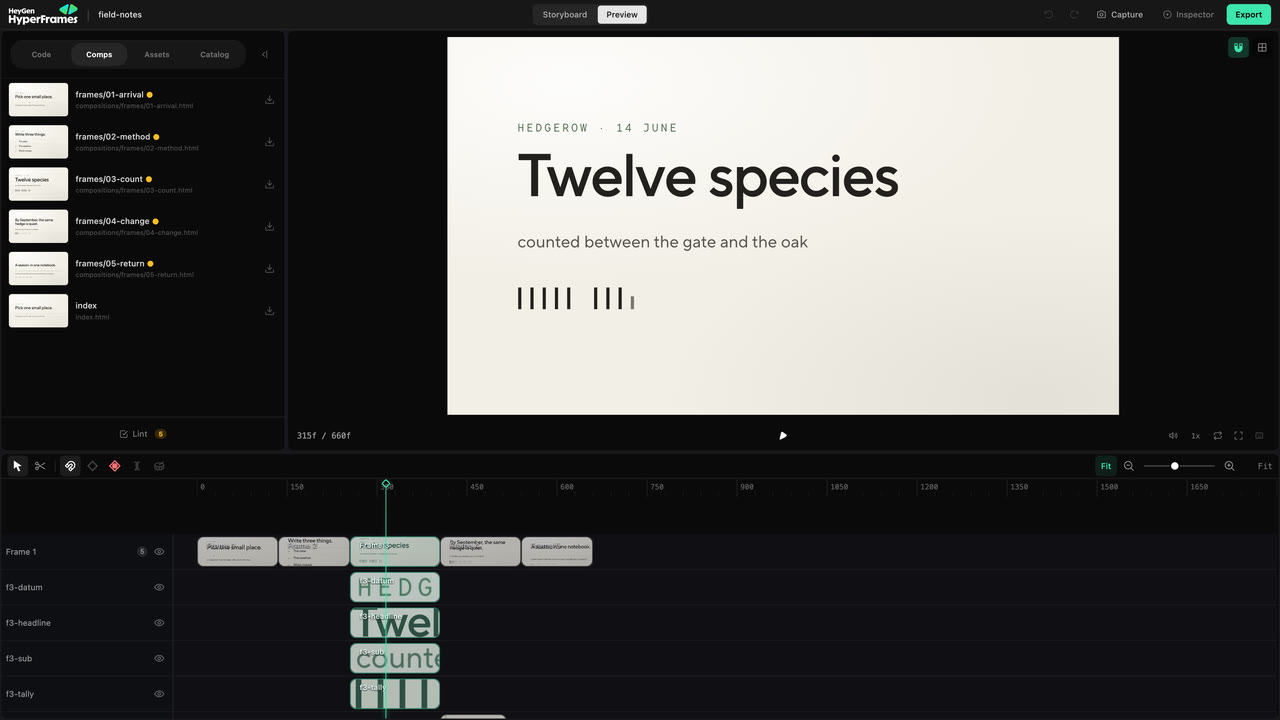
These are real product interfaces, not an illustration of a generic video editor. HyperFrames Studio shows its compositions and timeline; Remotion Studio shows a React project’s compositions, preview and tracks. The sample projects differ, so compare the controls and workflow rather than the footage itself.
HyperFrames Studio screenshot from the official HyperFrames editor documentation. Credit: HeyGen.
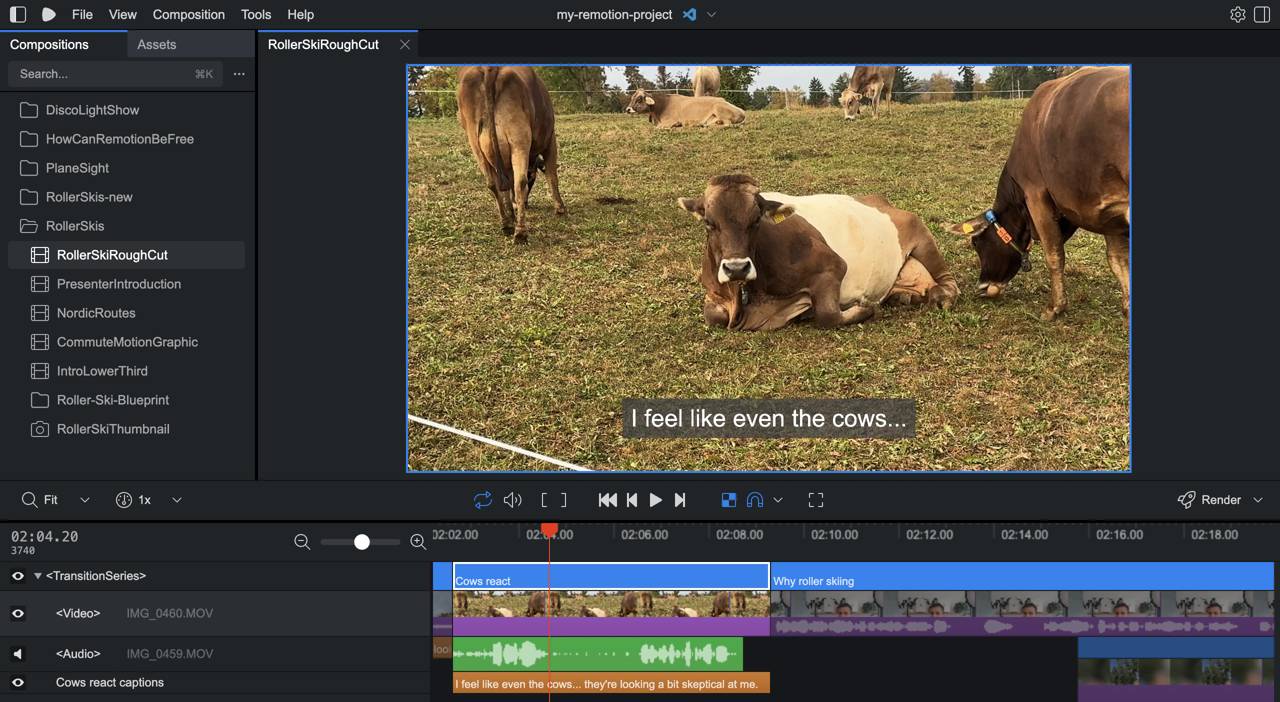
Remotion Studio screenshot from Remotion’s official first-video guide. Credit: Remotion AG. Interfaces may change as the products evolve.
The main difference is how you describe the video
HyperFrames describes a composition with HTML, CSS, media and seekable animation. A composition can be an index.html file with timing attributes and a registered animation timeline. Its renderer captures the composition and encodes the video.
Remotion uses React components as the source of truth. You can compose scenes, pass props, reuse components and derive animation values from the current frame. If you want to generate many versions of a video from structured data, that component model can be a comfortable fit.
| Decision | HyperFrames | Remotion |
|---|---|---|
| Primary authoring model | HTML, CSS and seekable animation | React components, JavaScript or TypeScript |
| Good starting point | A team comfortable styling HTML and building animation timelines | A team with reusable React components and data-driven layouts |
| Local workflow | CLI scaffold, preview, checks and render | Project scaffold, Studio preview and render |
| Animation approach | Seekable adapters for libraries such as GSAP, plus other supported runtimes | Frame-based React animation; other libraries need correct time control |
| Automation | Local rendering and documented cloud-rendering paths | Rendering APIs, batch workflows, Player and cloud options |
| Core licence and price | Apache 2.0; no framework seat or per-render licence fee for local use | Free for eligible individuals and teams of up to three; company licence for teams that do not qualify |
Both tools still need deliberate design. Typography, pacing, scene transitions, audio timing and readable captions will affect the result more than simply choosing a framework.
Set up HyperFrames for a small first video
The repository currently lists Node.js 22 or newer and FFmpeg for the local CLI workflow. Install those first, then follow the official CLI guide.
npx hyperframes init my-video
cd my-video
npx hyperframes doctor
npx hyperframes preview
The preview command stays running while you work. Use another terminal in the same project folder for checks, or stop the preview with Ctrl+C when you are ready.
Build a simple composition before adding lots of effects: one background, a title, a short product shot and an end card. The project uses timing attributes to place clips and supports seekable animation timelines. A normal web animation that only moves forward with wall-clock time may not render correctly when the exporter requests a specific frame.
When the composition is ready, use the documented validation and export loop:
npx hyperframes lint
npx hyperframes check
npx hyperframes render --output output.mp4
If you are using a coding agent, the repository also documents npx hyperframes skills update for its core standalone skills. Install them from the video project folder, reopen your agent if needed, and ask it to use the HyperFrames workflow. The quickstart explains the plugin, standalone and app-based paths.
Set up Remotion for the same kind of video
Start with Node.js installed and use the official Remotion setup guide. From a terminal, create a project:
npx create-video@latestFollow the prompts, choose a simple template and note the generated folder name. Enter that folder and complete the dependency installation shown by the scaffolder. Then open Studio:
npx remotion studioFor the animation, use the selected template's composition and change its text, colours, duration and assets. Keep movement tied to the video frame or a supported timeline integration. Avoid relying on an untracked timer to decide where an element should be.
To export, run the command below from the project folder and choose the composition when prompted:
npx remotion renderYou can also use Studio's Render button. Once you know your composition ID, the render guide explains selecting it directly and setting an output path.
Remotion also documents an agent-assisted setup. AI assistance is available on both sides of this comparison; it is not a reason on its own to choose one framework.
Which one is faster?
There is no trustworthy universal winner from the public documentation. The official HyperFrames comparison reports one agent-created 15-second video taking 11 minutes 50 seconds with HyperFrames and 12 minutes 30 seconds with Remotion from prompt to final MP4. That is the vendor’s single run, not an independent render benchmark; it includes the agent’s writing and setup time and cannot predict your project’s speed.
Both tools render browser frames and encode video. Remotion documents parallel browser tabs and cloud rendering, while HyperFrames documents seekable frames and local or cloud render paths. More concurrency can help, but effects, video decoding, fonts, network assets, CPU, memory and output codec can change the result. Remotion also documents parallel encoding; its benefit depends on the project and machine and it can increase peak memory use.
For your own decision, create the same 10-second scene in both tools, then time first editable preview, one content revision and final MP4 export separately. Use the same files, resolution, frame rate, machine and codec, and repeat each render. That measures the workflow you will actually pay for.
Try the same brief in both
A short test is more useful than comparing two unrelated showcase videos. Here is a brief you can give either tool:
Make a 10-second, 1920 × 1080 product intro at 30 fps. Use my supplied logo and product screenshot, a two-second opening title, a four-second product section and a closing call to action. Use licensed audio only. Keep the text readable on a phone and provide the editable project plus the rendered MP4.
Use the same assets, font, duration, resolution and machine for both versions. Compare how easily you can adjust a scene, replace a screenshot, make a portrait version and render again. If you compare render speed, record the settings and run conditions; one showcase clip cannot establish a universal winner.
Free versus paid: what will you actually spend?
HyperFrames: the core project uses Apache 2.0, with no framework seat count or per-render licence charge when you run it locally. You still pay for your own machine or cloud compute, optional HeyGen features or credits, agent subscriptions, and any third-party footage, fonts or music you choose. Do not confuse the HeyGen-maintained framework with similarly named third-party hosted generators.
Remotion: its current pricing page says individuals and organisations of up to three people can use all features free, including commercial work, subject to its terms. Organisations that do not qualify need a Company License. As listed on 27 October 2026, Remotion for Creators is $25 per seat per month for low-volume local creation; Remotion for Automators lists $0.01 per render with a $100 monthly minimum for automated products. These are different usage models, not a single price every team pays. Cloud compute and third-party services may add costs. Check eligibility and live prices before committing.
| Situation | HyperFrames | Remotion |
|---|---|---|
| Solo creator or small team making videos locally | Core framework free under Apache 2.0; pay for your own resources | Free if eligible under Remotion’s licence |
| Commercial organisation with more than three people | Core framework licence stays Apache 2.0; infrastructure and optional services cost extra | Company License generally required; pricing depends on use |
| Automated rendering at scale | Budget for your cloud infrastructure and any optional hosted service | Budget for the applicable company plan plus rendering infrastructure |
How we would choose
For a standalone agency promo built around styled HTML, media and GSAP-style motion, we would start by testing HyperFrames. For a React team building reusable video templates, personalised outputs or an application around video generation, we would start by testing Remotion and its APIs.
Neither recommendation requires migrating a working project. Take one small brief through preview, revision and final export first. That will tell you much more about your production workflow than an impressive demo alone.